


Diamonds and Triangles
A look at the structure behind the rapid rise of the Baby Hawks

We love contributions from the Hawks Insiders community, and today HI Subscriber Dominic Thompson (@DominicDavid22) takes a deep dive analysis into the structure and game plan that Sam Mitchell has us winning games with.
A happy team down at Waverley Park, but why might you ask? What are the reasons behind the rapid ascent by our baby Hawks? I think I have the answer for you.
If you had told anyone after an 0-5 start, that the Hawks would be 12th by the mid-way point the season with a 6-7 record you would have been laughed at. Either that or at least copped some strange looks and interesting responses.
Many people would have questioned, why, how, when. Why did this occur? How did this happen, and when was the breakthrough moment that it started?
The part that I will be going through in this article is the structure — in particular two key structural points that will be looked at under the microscope.
But first some stats.
Hawthorn in 2024 is first for ground-balls post clearance and by round eight were rated as one of the best ever recorded sides in this category since Champion Data started recording stats in 1999.
“This year, they’re now number three in terms of being able to defend the opposition going from D50 into Forward 50. And largely that’s off the back of this element, this element to be able to cut off the opposition when they’re in that general flow and the ball’s on the deck to be able to win it.” - Daniel Hoyne of Champion Data
From stats that were released as at Round 11, Hawthorn was ranked first for ground-balls post clearance at +99, which is the best of any club in the past three seasons at the same point of the season (R11), and well ahead of the next best in 2024.
The round 8 figure had Hawthorn +91 and since Champion Data started only six teams had better tracking:
Essendon 2000 (+124 – flag)
Geelong 2009 (+111 – flag)
Collingwood 2011 (+98 – runners up)
West Coast 2003 (+97 – 7th and proceed to win the flag within 2-3 seasons)
Geelong 2020 (+93 – runners up)
Hawthorn (+91) of 2024.
#1 The Diamond
The structure of the ‘diamond’ is an essential part of our gameplan, and how this correlates to strength around the contest.
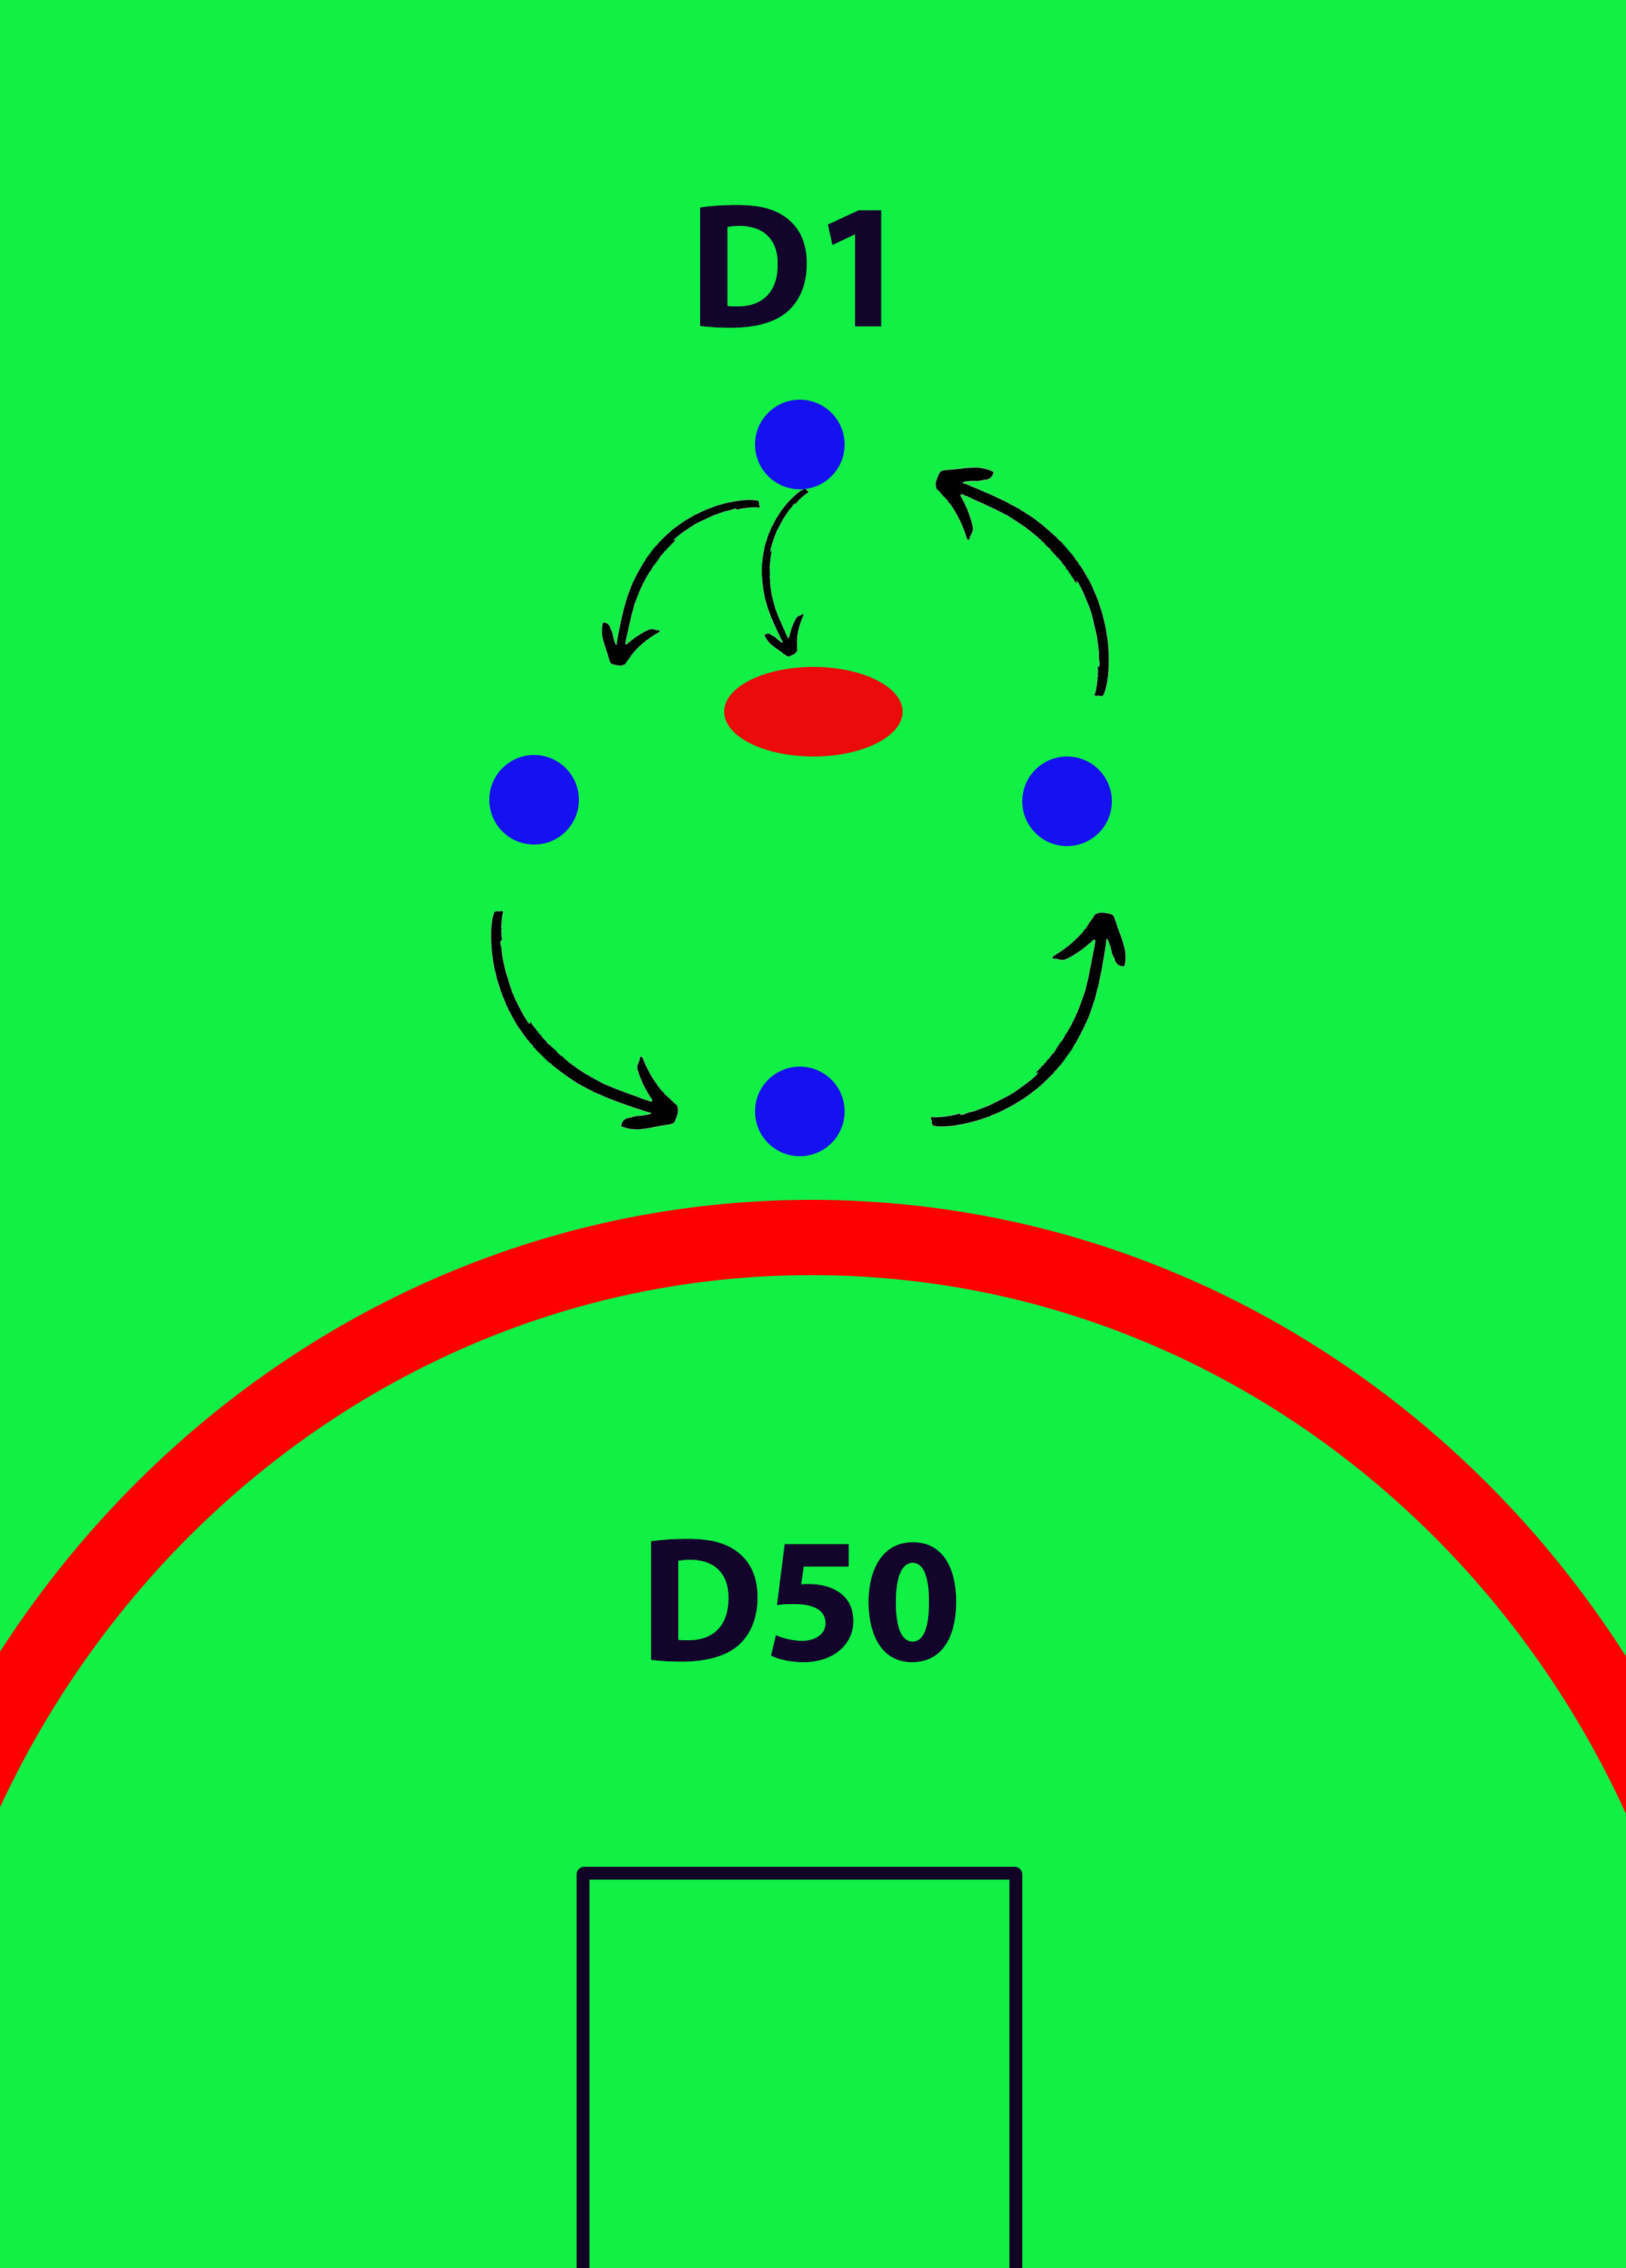
This structure is held around the ball/ball-carrier and exists in a diamond formation with a four-player setup with two to three setup diagonally toward the centre of the ground.
This formation has two on either top side of the ball and two on either width sides, in the shape of a diamond.
One player, on the top side of the diamond, is considered D1 (which means defender #1, who attacks the ball carrier). This player is the first to tackle and attack the ball and opposition ball carrier. From this, a flow-on effect happens with players moving in a cyclone motion to cover the space in front of them while holding the shape and width of the diamond.
Offensively, the ‘D1’ player would be trusted to win the ball in dispute and the other players hold width for handball receives and chain possessions. This tends to be nominated to whoever is closer to the ball point.
A structure such as this makes defending a lot easier holding width and keeping the ball in tight once the ball is won back, through contest post-clearance. Width allows chain possession into space and allows dangerous ball movement on the outside. This in turn has led to higher efficiency and scoring from these situations.
The return of our A-Grader
In the past four to five weeks since Will Days has returned, Hawthorn has been a much stronger on-ball brigade, with the key role of the high half forwards pushing up around the ball to create an outnumber leading to clean, quick, precise ball movement and a handball chain out of stoppages.

This is in key part with holding and maintaining width outside of the diamond, creating more opportunities for damaging possessions in space, rather than the less effective dump or hack kicks aerially.
The tactic has positively impacted our scoring capacity:
Rounds 1-8: -19.7 (18th) for scores from clearance differential
Rounds 9-11: +15.7 (3rd) for scores from clearance differential.
These figures go hand-in-hand with the adaptation to the structure of the diamond, allowing for width, easier ball movement and chains leading to space with higher efficient scoring areas as mentioned previously.
This is not to say Will Day is the only reason for the rapid rise, but he is a key piece in the puzzle.
A learning process
Another part of this has been the time it has taken to turn this structure from theory- based learning to to on-field adaptation, and then growing it to become second nature. In other words: from a theoretical back-of-mind thought to a trained and well-executed plan that becomes a natural footballing instinct — where players play at their best.
That is structure naturally occurring and being an afterthought, but still happening while players can focus on other, more important things, and be simplifying the game.
This is key to success of any structure, or technique, and goes for all sporting codes.

#2 The Bermuda Triangle
The other dynamic structure I have been witnessing is what I refer to as a ‘mini-Bermuda Triangle’. This is setup behind the ball — regardless of whichever side of the ground the ball is on.
Ball-side is referred to as the ‘skinny side’ and the open side is referred to as the ‘fat side’.
The skinny side behind the ball — whether a stoppage, or ball in-dispute — has the triangle setup in a multi-layer structural zone. This triangle includes the front point, and the back two points. This is key for ball movement from defensive 50 and allows for easier defence, but more importantly counterattacks and turning defence into attack, with a key balance between the two.
At the front of the point, you will have your key, or general interceptor. This role for the Hawks has been played mainly by James Sicily, with Jack Scrimshaw, Sam Frost and Josh Weddle also part of this rotation.
The two backsides of the triangle tend to be the half back flanks, with this triangle being ran off the half backline. For Hawthorn, these two tend to be a mix of Karl Amon, Jarman Impey, Weddle and others who rotate off half back.
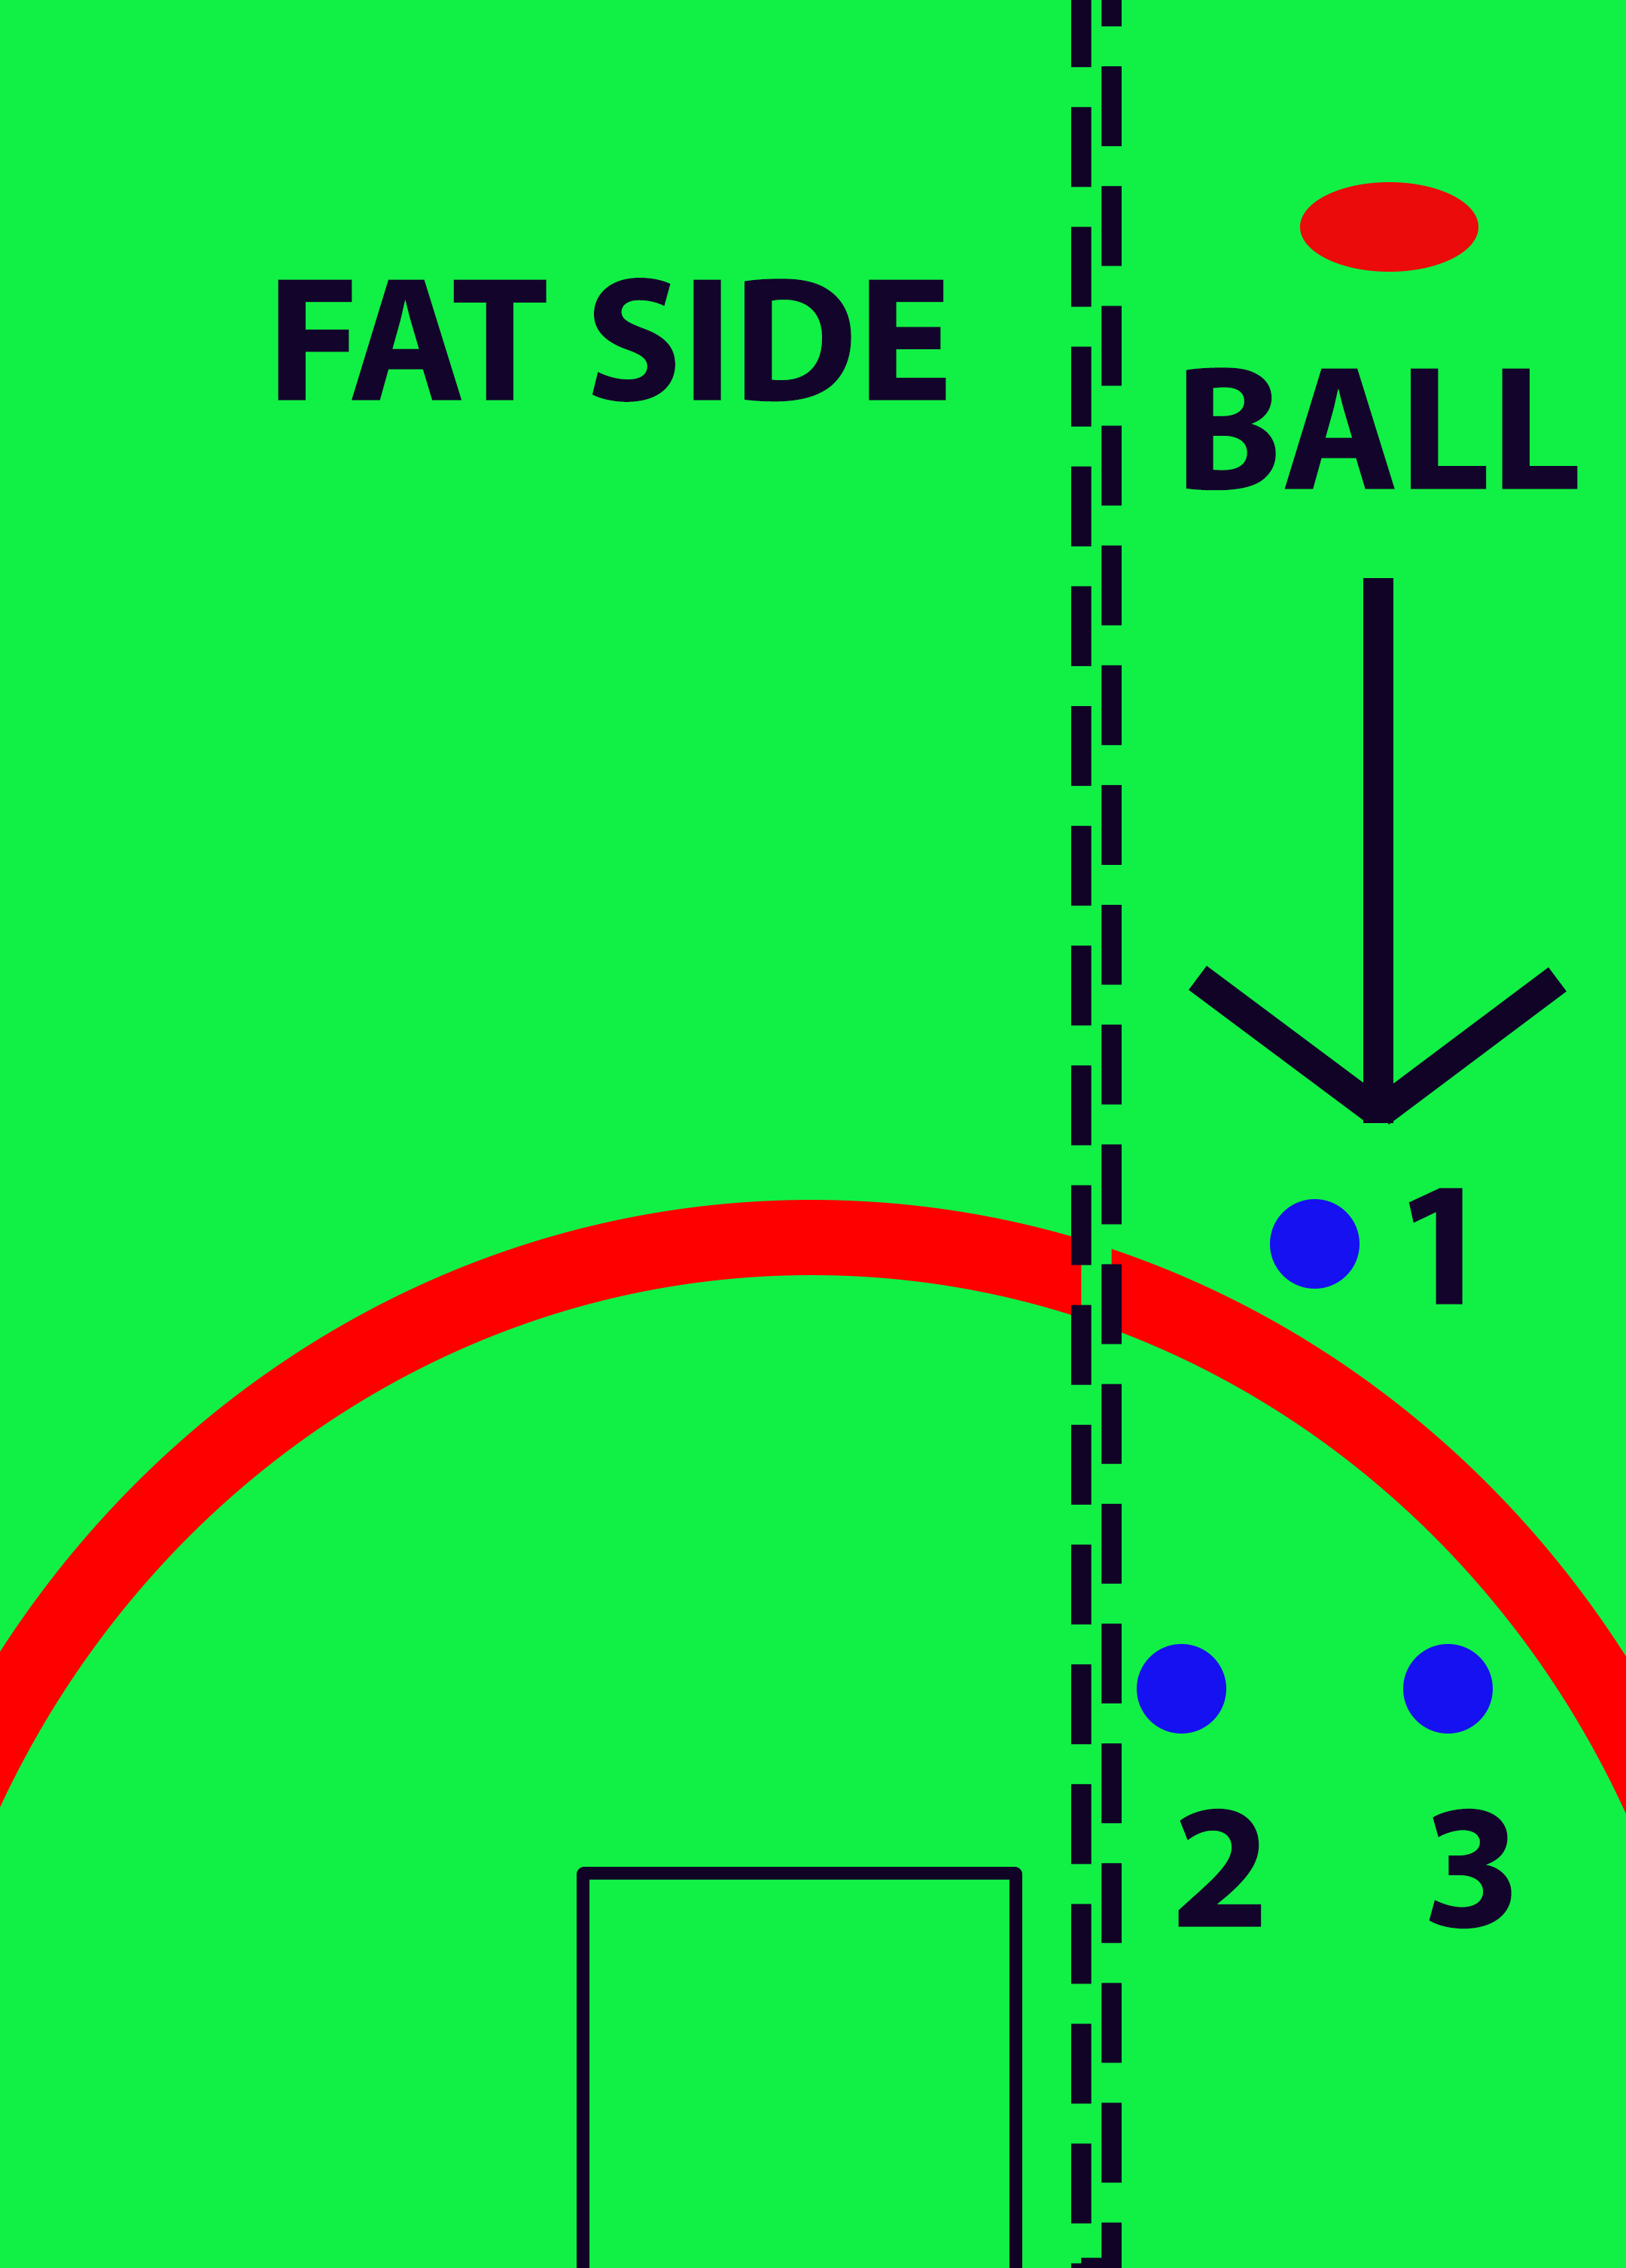
The key part to the positioning of this structure and zone is the top of the triangle being in the most dangerous position to intercept, with the other two on the backside setup which holds width and zone, while also being the next in line or next dangerous intercept players.
Through the backside of the triangle, you are able to maintain an 18-man zone while also holding and owning width, and the outside. This is important for spread, switching and easy handball receives — thus leading to fast ball movement behind centre and catapulting the play past centre.
This is also why Hawthorn is rated as one of the best movers of the ball in the entire competition from defensive 50 to inside forward 50.
Many teams run this structure or in a similar aspect with some examples including Tom Stewart at Geelong, Luke Ryan at Fremantle and Sam Taylor at the Giants being used the key focal points of this triangle.
The ‘Bermuda Triangle’ is as it sounds — a death triangle for intercepting and counterattacking with interest, and this formation again comes down to trust and maintaining zones/structures which are setup as an afterthought and back of mind — much like in the diamond formation.
Can anyone spot it?
The final words I have for this discussion are to keep your eyes open, and see if you can notice these structures in real-time.
It goes a long way to explaining how we have been so strong post clearance around the contest, and why the Hawks have also been super strong at ball movement, turning defence into a counterattack from the defensive half.
It will be wonderful to see how this can continue to progress over the coming weeks, months and years.
Want to contribute to HI? Email hawksinsiders at gmail dot com.
Don’t forget to listen in as the HI team goes live on Wednesday nights on X (Twitter). Follow us on social media through the links below:
So good Dom, what a debut 🙌🏻
Nice explanation Dom. In my 72 years following the Hawks the scientific evolution of the game and the terminology has been significant. Thanks for the explanation which helps. I am greedy I want another flag in my lifetime 😁